
The ultimate goal of a splashback should be to prevent food, oil and water splashes from sticking to the wall. You should also choose a cooking area wall covering which is durable, easy to maintain and clean. The best kitchen splashback is the one that matches your current design and style. Today, on Trendstyle we’ll discuss the main qualities of kitchen splash guards, how they should cover a wall and what are the alternatives to tile backsplash.
Kitchen backsplash placement
In modern kitchens, kitchen hob splashbacks have become a necessity for both practical and aesthetic reasons. You risk having to replace your kitchen walls in the future if you don’t install a backsplash. Heat from your stovetop, and water splashes, will eventually deteriorate the plasterboard. When planning your renovation, the arrangement of the splashback panel in the kitchen is a crucial consideration. If you’re thinking of where to put a splash guard in your kitchen, here are some popular options.
Kitchen counter splashback
Your splashback can be placed along the wall of your kitchen, adjacent to the food preparation area. It is both practical and attractive to have a backsplash between an entire row of upper and lower cabinets. Kitchen worktop and splashback thoughtful combination helps to make the space feel larger and more cohesive by connecting the two sets.
The essential question then arises, where should the wall splashback in the kitchen end? Well, mostly it finishes at the bottom level of the upper cupboards. However, some homeowners choose to continue the tile up to the ceiling. It can give the illusion of a taller kitchen by drawing the eye upwards. It can also highlight open shelves or other features, depending on what style of splashback for kitchen walls you choose.
Kitchen sink splashback
To make the walls waterproof, splashbacks for kitchen sinks are typically placed directly behind and above the damp area. A sink splashback for the kitchen is designed to protect your walls from moisture, splashes, and other messes that may occur when washing dishes and preparing food. By preventing water damage and stains, they help maintain the cleanliness and durability of your kitchen walls.
If you want to give your kitchen a unique and personalized touch, you can experiment with installing an accent splashback over the kitchen sink. An accent splash guard can add a pop of color, texture, or pattern, making the area visually appealing and enhancing the overall design of your kitchen. This not only serves a practical purpose but also contributes to the aesthetic value of your kitchen space.
Kitchen stove splashback
Cleaning up the mess left by your stove can be quite challenging. Grease and sauce splatters can accumulate on the wall behind the hob and leave stains. The cooker hob splashback makes the job easier.
But splashbacks for cookers no longer serve just a utilitarian function. The thing is that a modern splashback for behind the cooker can also significantly enhance the visual appeal of your kitchen. With a wide backsplash materials options, can become a focal point in your kitchen, adding a touch of elegance and personality. You may choose glass splashback for hob or even stainless steel hob splashback and it will transform your kitchen from ordinary to outstanding.
Hob splashback safety requirements
There are certain kitchen splashback australian standards of what wall materials can be used behind gas stovetops. The wall behind a gas stovetop or splashback for hob must have at least one fire-resistant material if it’s within a 200 mm or less distance from the burners. If any vertical surface is less than 200mm from the nearest gas burner, it needs to be protected.
You can use the following materials for splashback behind hob to meet safety standards:
| Material | Splashback thickness | Underlay material |
|---|---|---|
| Ceramic tiles | At least 5 mm thick; | Gypsum-based plasterboard that is at least 10 mm thick; Fibre cement sheet that is at least 6 mm thick. |
| Glass splashbacks | At least 5 mm thick; | Gypsum-based plasterboard that is at least 10 mm thick; Fibre cement sheet that is at least 6 mm thick. |
| Sheet metal | At least 0.4mm thick; | Cement sheet that is at least 12 mm thick; A combination of fibre cement sheet that is at least 6 mm thick and gypsum-based plasterboard that is at least 10 mm thick. |
A flame retardant kitchen cooker splashback will only be required if your cooking device is an open flame, such as a gas stove. Electric devices, such as radiant or Induction hobs, require 50 mm distance from the back edge of the cooktop. The flame retardant material is there to protect from heat/flame that is generated continuously during cooking.
Acting as a protective layer, the splashback for the gas hob needs to cover the entire width of the cooking zone and extend at least 150 mm above the edge of the nearest burner. To correspond with rangehood or any cabinets above the cooktop, the kitchen splashback height must be at least 600 mm. However, many rangehood manuals now recommend a distance of 650 mm regardless of the cooktop type. Make sure to check the rangehood installation guidelines when choosing your kitchen splashback sizes.
You may use kitchen splashback trim or or bullnose tiles to create a highlighted edge. Otherwise, you could use a creative design for the edge such as tapering off a tile set.
Splashback material types and features
In the old days, the only option for homeowners who were upgrading their kitchen was to choose traditional tiles for kitchen splashback. In recent years, modern kitchen splashback options like tempered glass or engineered stone are becoming common. Splashback sheets are designed to keep oil, water, and other contamination off the walls. Splashback materials that are easily wiped down are therefore becoming more necessary and diversified.
Not only does it provide practical benefits like protecting your walls, but it also enhances the overall aesthetic of the space. With a variety of materials, colors, and patterns available, they can add a touch of style, making your kitchen more durable and visually appealing.
Different kitchen wall panels for splashbacks provide varying degrees of durability, heat and stain resistance. Kitchen splashback design is also an important consideration, since you want it to complement the overall look of your kitchen and dining area, as well as the existing appliances. Here we have listed different types of backsplash materials you can use for your kitchen.
A tiled kitchen splashback
Tiles are a great way to add classic style and charm to your kitchen. It can be used as an independent feature, or it can also be added as the finishing touch for a larger kitchen wall covering. Kitchen tile splashbacks offer a wide diversity of designs and patterns, from mosaic and large tile splashbacks:
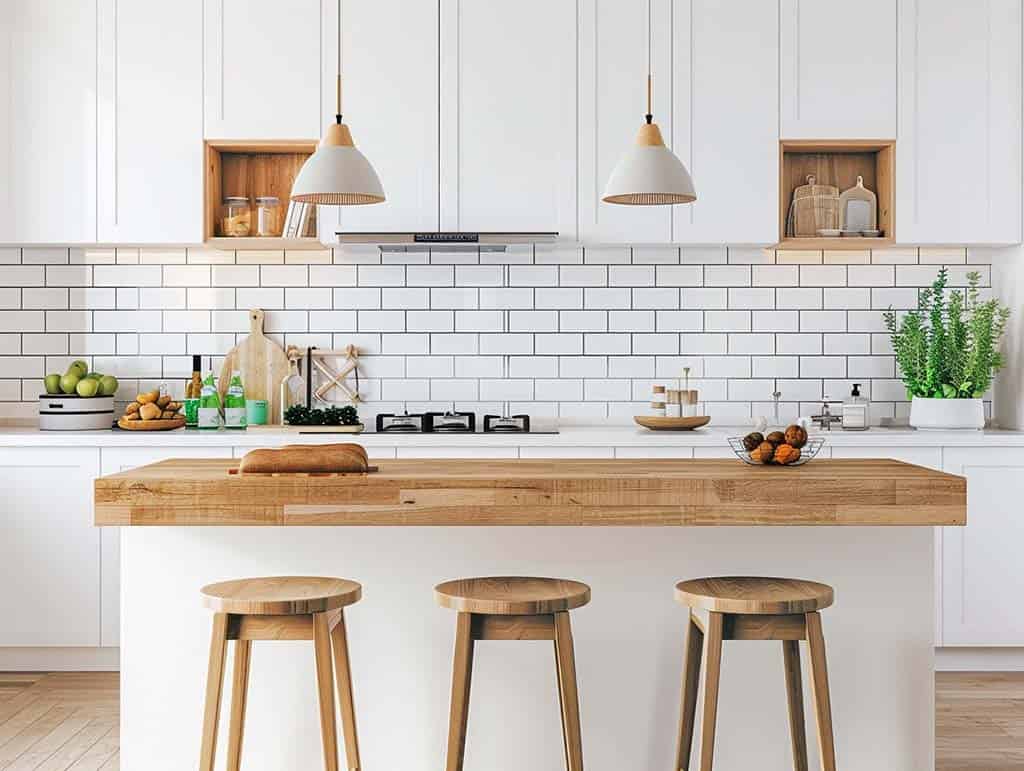
- Subway tile splashback – the traditional orientation of subway tile is horizontal straight stack. However, you may choose laying them vertically or in brick style to create an urban look in the kitchen.
- Herringbone splashback – laid out in a zigzag pattern, this classic design adds a sense of movement to the kitchen. Herringbone tiles kitchen splashback work well with various tile materials and colors, allowing for customization to match different kitchen styles, from modern to traditional.
- Mosaic splashback – small tiles can be arranged in various designs and colourful patterns. Mosaic tiles are made from different materials such as glass, porcelain, stone, or metal, making them resistant to heat, moisture, and stains. The numerous grout lines can make cleaning more time-consuming and require regular maintenance
- Large format tile splashback – often measuring 30×60 cm or larger, they are usually used for covering the whole space behind kitchen counters. These tiles create a sleek, modern look with minimal grout lines, enhancing the kitchen’s overall aesthetic.
Tip: When choosing materials, it’s best to avoid textured tiles for kitchen splashback. While they may add a unique visual appeal, textured tiles can be difficult to clean and maintain. Grease, and grime can easily get trapped in the crevices and uneven surfaces, making it challenging to keep the area hygienic. Opt for smooth, glossy tiles instead, which are easier to wipe down and keep clean, ensuring your kitchen stays fresh and sanitary.
Even though wall tiles have been traditionally preferred, the grout between the tiles can catch food and dirt. The smaller the tile, the more grout you will have to clean. This can cause it to discolour and ruin the overall look of your kitchen. Still, there are different materials you can use as a kitchen splashback alternative to tiles.
Tempered glass splashback for the kitchen
Nowadays, kitchen glass splashbacks are the second most commonly found option for modern kitchen designs. The glass surface is durable and resistant to water. Once the glass is hardened, it can withstand heat of up to 425degC. This makes it an excellent choice for a splashback for a cooker hob.
Glass has a range of styles, such as painted, frosted or mirrored backdrops. You may even choose intricately designed wallpaper, then place a clear piece of tempered glass on top.
- A back-painted glass splashback for the kitchen is made of a sheet that has been custom-cut to fit the wall perfectly without seams and grout. The backside of the glass can be painted with a special paint or imprinted with an image or design. The paint or image is visible on the front but cannot be damaged, scratched or stained. You can choose from many colours that can be matched to your interior or kitchen accessories.
- Vinyl image splashbacks have all of the advantages that the glass splashbacks with the painted backs do. Instead, an image will be printed and put behind to achieve the desired appearance.
- A mirror splashback is made from reflective glass. The choices can be neutral-silver, bronze-tinted or smoked mirror splashback and are impressive for any kitchen. A reflective splashback can make a small kitchen appear larger or brighten up a room by reflecting the natural and artificial lighting. Cleaning will be more frequent for mirror splashbacks since splashes and even fingerprints can be seen more easily.
Other backsplash materials
While tiles and glass are popular choices for cooker hob splashbacks, there are compelling reasons to consider other materials. The following alternatives can offer unique aesthetics, practical benefits, and even cost savings:
- Metal splashback panels are increasingly popular. Materials like copper, stainless steel and brass reflect light and can elevate the style of your kitchen. Metal backsplashes have a range of sheens and texture, from shiny, to brushed metal and geometric patterns. Copper kitchen splashback is easy to clean and resistant to heat. The specific copper colour requires careful matching with other kitchen design elements. As for stainless steel splashback, you should consider your appliances finishing, since it can create too many steel surfaces.
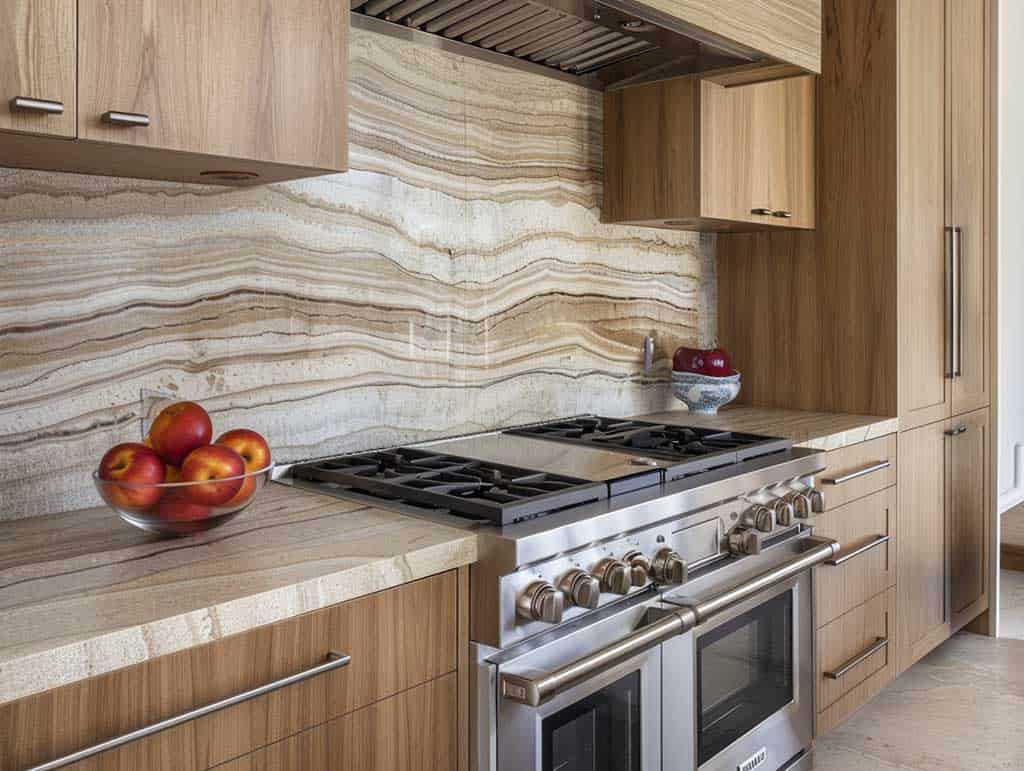
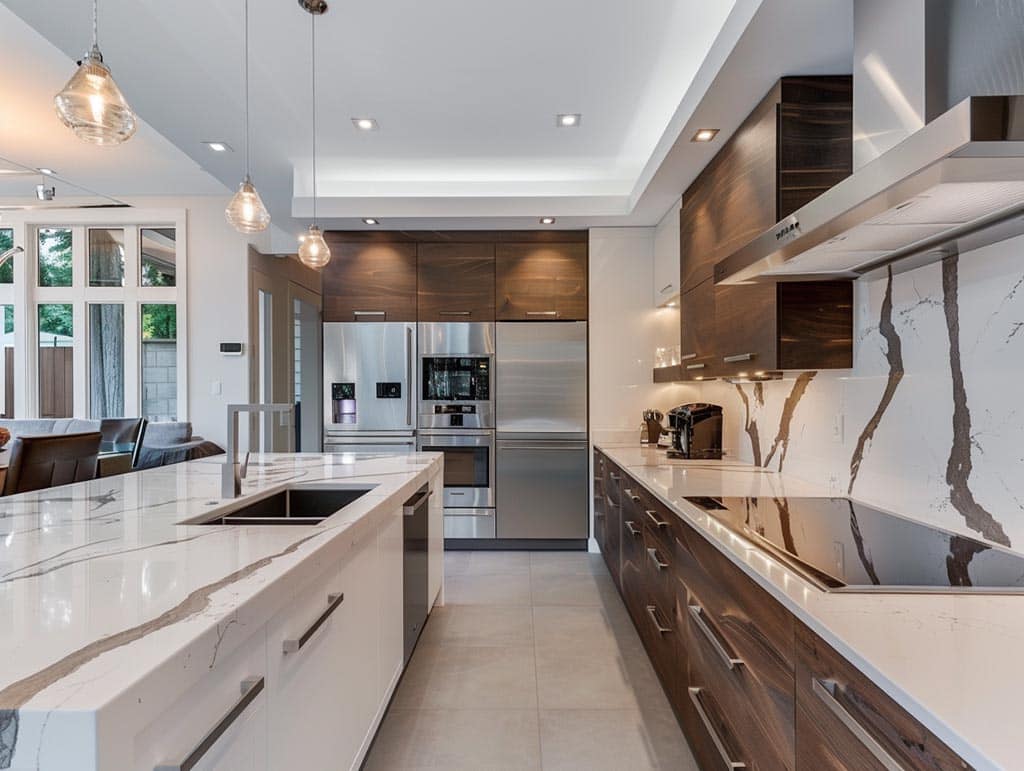
- Stone splashback – although, this design has become one of the most popular ones in recent years, not all slab tiles are suitable for kitchen splashback. The engineered stone or quartz surface can be made of a grinded stone and is then bonded to a polyester resin that can be flammable. It may not be suitable for use if there isn’t sufficient distance behind the cooker. Some people also say that the stone is prone to discolouration when heated frequently. Still, homeowners choose to use the same stone splashback as for benchtops to have a coherent design. The cleaning of stone surfaces such as a marble splashback in the kitchen should be performed with liquid cleaners that are pH neutral and do not contain abrasive substances. You can clean them with a soft cloth and regular dish soap.
- Acrylic kitchen splashback is an affordable alternative to toughened glass splashback. Acrylic splashbacks for kitchens are typically made out of high-quality, heat resistant plastic. You should always check that the polymer splashback wall panels you select have a fire rating, particularly if you plan to install them behind your stove. You can go with one-colour kitchen acrylic splashback for a minimalist kitchen or choose for instance marble look splashback to fit your theme.
Each type of backsplash has its own benefits and features. Some kitchen wall splashback panels can be categorized by their cost or practicality. Others may offer more style and elegance – only you can choose what is the best kitchen splashback based on the desired features. Although most materials used for backsplashes will last for many years, it is still worth screening samples to ensure that the material is right for you.
Kitchen splashback cost
It’s all too easy to forget about the vast difference between price and value. Installing affordable kitchen splashbacks in your kitchen might tempt you, but do not assume that it is the only expense. The overall cost includes not just the price of materials but also the installation costs, which can vary significantly based on the type of splashback you choose and the complexity of the installation.
Different kitchen splashback prices:
- Tile splashback cost can be relatively affordable, with prices varying based on the type of tile (ceramic, porcelain, glass, etc.). In Australia it ranges from AU50 to AU 200 or more for large format tiles. The cost of tiling a kitchen splashback can vary depending on the size of your project. Retiling a kitchen splashback can be a cost-effective way to refresh your kitchen’s look without a full renovation.
- Glass splashback cost includes the price of toughened glass, AU300 on average and the installation, which requires precision and expertise. However if you have multiple wall areas that require several sockets cut out, the installation costs can be quite high. Additionally, the price of a mirror splashback that is toughened will generally double.
- Stone splashback costs, such as marble or granite, tend to be more expensive due to the cost of the material, which ranges within AU360 AU420, and the complexity of installation. Engineered stone can be a bit more affordable but still falls on the higher end of the cost spectrum. Installation costs can add up, especially if precise cuts and fittings are required.
Installation cost
Despite the fact that materials take main expenses, installation costs can significantly impact the price of your kitchen splashback. installation costs can range anywhere from AU400 to 950, depending on the complexity of the job and number of cutouts needed. Factors such as the size of the area, the number of cuts and sockets required, and the complexity of the design all contribute to the final cost. The cut-outs for sockets are the most common. They can cost as little as $50 or more, depending on material.
Planning a kitchen renovation requires considering both material costs and installation expenses for an accurate picture of your budget. While cheaper materials might tempt you, investing in higher-quality splashbacks could offer greater durability, easier maintenance, and a more pleasing aesthetic in the long run.
FAQ
installing a splashback behind a kitchen sink is essential to protecting walls from water splashes and stains and maintaining a healthy environment in which to work and live. Waterproofing a sink splashback ensures protecting against moisture damage and prolonging its longevity, especially near areas like sink and stovetops.
How to clean the kitchen splashback?
Cleaning a kitchen splashback depends on its material. Generally, use mild soap and water for regular cleaning, while for tougher stains non-abrasive cleaners and soft cloths should be utilized instead of harsh chemicals that could potentially harm its surface.
How much does kitchen splashback cost?
The cost varies based on the type of materials and the size of the area. Tiled options can range from AU$50 to AU$200 per square meter; glass splashback costs approximately AU$300 per square meter and stone splashback is from AU$360 to AU$420 per square meter. The labour cost also depends on complexity of installation and project sizes.
How to install splashback in kitchen?
To put splashback in kitchen, measure the area and cut the splashback material to size. Prepare the wall surface by cleaning and drying it thoroughly. Apply adhesive directly onto either the wall surface or behind the splashback; press into place while secure it with adhesive. Allow time for drying before caulking or grouting any edges that might require treatment. For larger format tiles or solid backsplash panels installation it is advised that professional tilers be hired.
What is the best splashback for a range cooker?
A suitable gas hob splashback should be heat resistant, easy to maintain, and long-term durable. Materials like stainless steel, ceramic tiles or tempered glass are great options for splashback behind a hob. Just be sure it meets any safety standards regarding heat resistance when choosing one for a gas cooker!